-
Welcome to My Website
This is a text box. Write your own content here. This is an excellent place for you to add a paragraph.
การตั้งค่ารับเมล์ Google Workspace ผ่าน MS Outlook (POP)
POP (Post Office Protocol) เป็น Protocol มาตรฐานที่ใช้งานในการคัดลอกข้อมูล E-mail message ทั้งหมดจาก อีเมลล์เซิร์ฟเวอร์มายังเครื่องที่ทำการเชื่อมต่อโดยจะทำการอัพเดทเฉพาะข้อมูลใหม่ที่พบในอีเมลล์เซิร์ฟเวอร์เท่านั้น และเมื่อดึงข้อมูลมาแล้วโปรแกรม Mail Client มักจะลบข้อมูลใน Mailbox server
ทำการตั้งค่าให้ Apps อื่นๆสามารถเข้าถึง Google Workspace
1. ให้ทำการ Login เข้าสู่ Admin Console ที่ https://admin.google.com
2. เปิดให้ User สามารถกำหนด Allow less secure app ได้เอง โดยไปที่ https://admin.google.com/AdminHome#ServiceSettings/notab=1&service=securitysetting&subtab=lesssecureappsaccess หรือสามารถเข้าโดยไปที่เมนู Security > Basic Settings > less secure app > Go to settings for less secure apps
3. ทำการเลือก “Allow users to manage their access to less secure apps” เพื่อให้ Users สามารถจัดการเปิดการใช้งาน less secure apps เองได้

หมายเหตุ กรณีต้องการเปิดใช้งาน less secure apps ให้กับทุก Users เลย โดยไม่จำเป็นต้องได้รับความเห็นชอบจาก Users นั้นก่อน สามารถทำได้โดยเลือก “Enforce access to less secure apps for all users (Not Recommended)” หลังจากนั้นสามารถข้ามขั้นตอนข้อ 4-6 แล้วไปที่ “วิธีการเพิ่มบัญชีผู้ใช้ Google Workspace บน MS Outlook” ได้เลยฃ
4. ทำการ Login เข้าสู่ Google Workspace โดยใช้บัญชีผู้ใช้ที่ต้องการตั้งค่ารับเมล์ ที่ https://accounts.google.com
5. ไปที่ https://myaccount.google.com/security
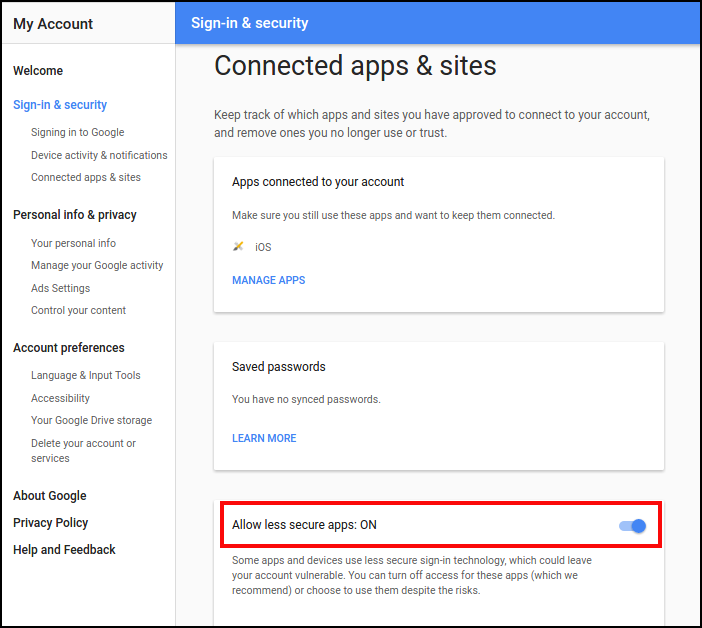
6. ในส่วน Connected apps & sites ให้ทำการ Allow less secure apps
เปิดการใช้งาน POP
1. ทำการ Login เข้าสู่ Google Workspace โดยใช้บัญชีผู้ใช้ที่ต้องการตั้งค่ารับเมล์ ที่ https://accounts.google.com
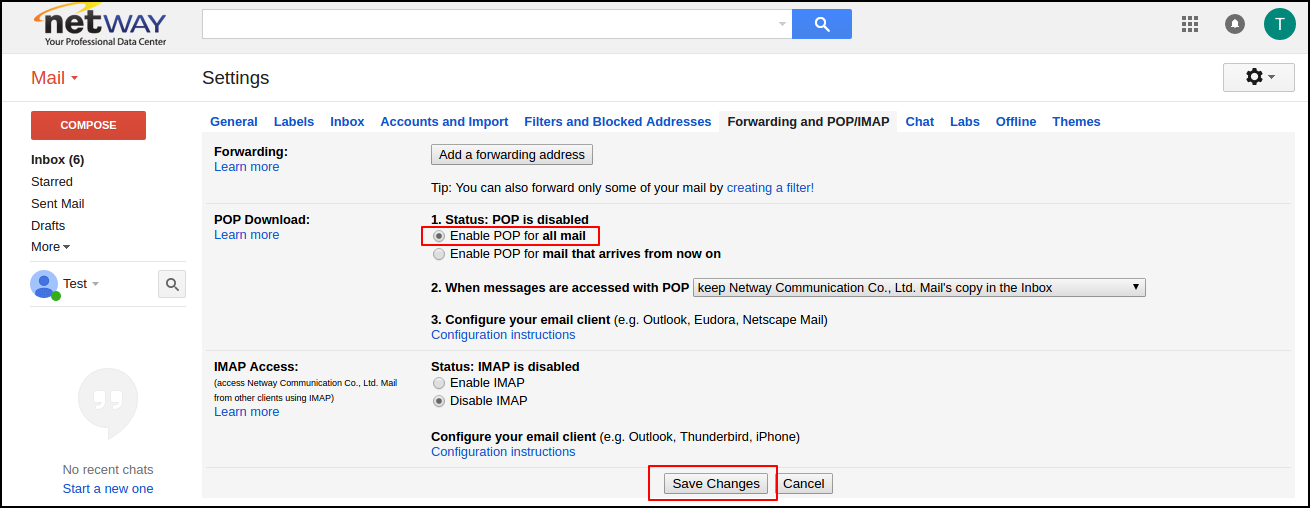
2. ไปที่ https://mail.google.com/mail/ca/u/0/#settings/fwdandpop
3. ทำการติ๊กในส่วน Enable POP for all mail แล้วทำการบันทึก
วิธีการเพิ่มบัญชีผู้ใช้ Google Workspace บน MS Outlook
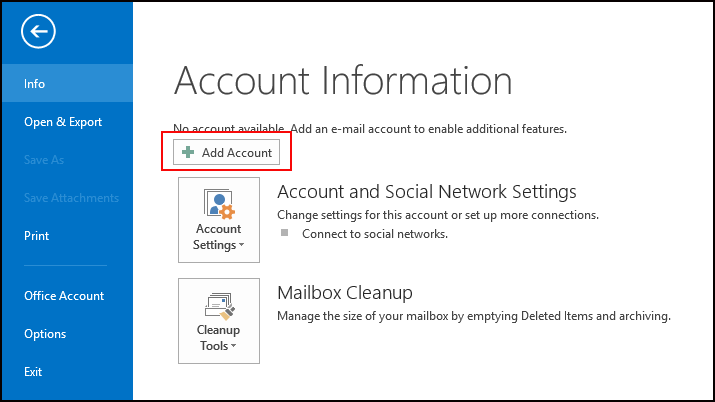
1. ทำการเพิ่มบัญชีผู้ใช้ใหม่ขึ้นมา
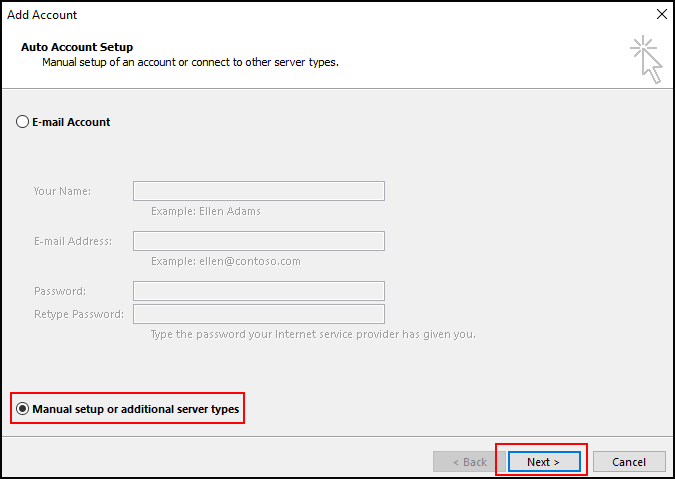
2. ทำการเลือก “manual setup or additional server types”
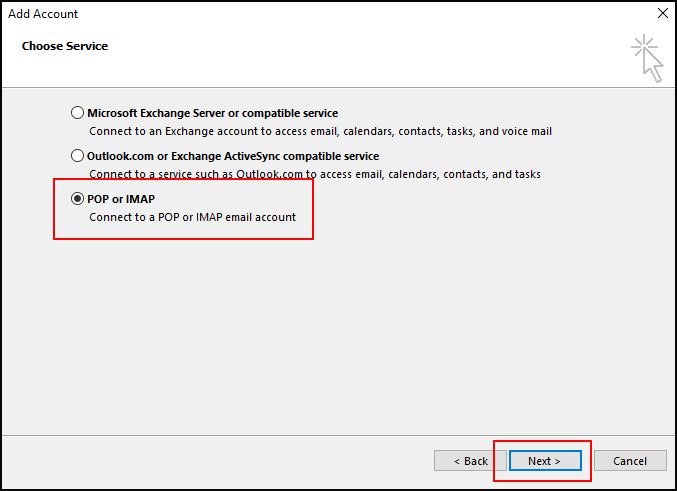
3. ทำการเลือก “POP or IMAP”
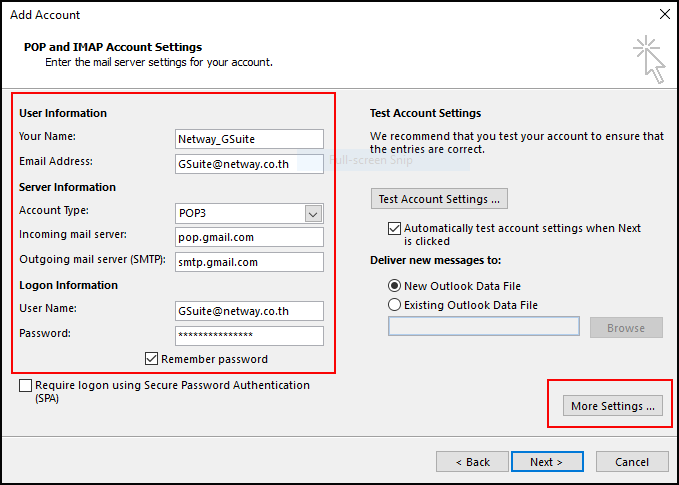
4. ทำการตั้งค่าต่างๆรายละเอียดดังนี้
- Your Name: ใส่ชื่อผู้ใช้งาน (สามารถใส่ชื่ออะไรก็ได้)
- Email Address: ให้ใช้ค่า Email ที่สร้างไว้บน Google Workspace
- Account Type: POP3
- Incoming mail Server: pop.gmail.com
- Outgoing mail Server (SMTP): smtp.gmail.com
- User Name: ให้ใช้ค่า Email Account ที่สร้างจาก Google Workspace
- Password: ให้ใช้ค่ารหัสผ่าน ที่สร้างจาก Google Workspace พร้อมทั้งทำการติ๊กช่อง จำรหัสผ่านไว้ด้วย
- ทำการคลิ๊ก “More Settings ...”
5. เลือกที่หน้า Outgoing Server ให้ทำการเลือก "My outgoing server (SMTP) requires authentication." และเลือก "Use same settings as my incoming mail server”
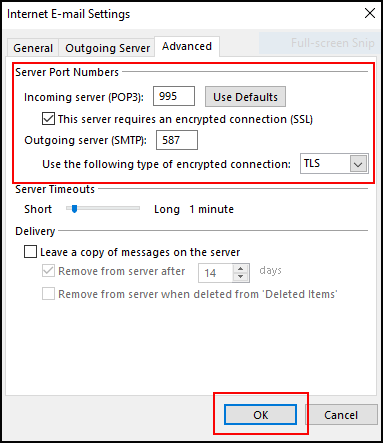
6. เลือกที่เมนู “Advanced” และตั้งค่าดังนี้
- Incoming server (POP3): 995
- ติ๊กถูกที่ This server requires an encrypted connection (SSL)
- Outgoing server (SMTP): 465 หรือ 587
- use the following type of encrypted connection: SSL (กรณี Port 465) หรือ TLS (กรณี Port 587)
7. หลังจากตั้งค่าตาม (ข้อที่ 6) เรียบร้อย ให้กดที่ปุ่ม “OK” และโปรแกรมจะทำการทดสอบการตั้งบัญชีผู้ใช้ และเมื่อทดสอบเรียบร้อยให้กดที่ปุ่ม “ปิด”
บทความในส่วนนี้
-
วิธีการย้ายเมล์จาก Microsoft Outlook เข้าสู่ Google Workspace
Updated on 2022-01-14 04:38:30
-
การตั้งค่า Split Delivery (Routing Email Hybrid)
Updated on 2023-11-01 08:40:18
-
การตั้งค่า Mail Forward
Updated on 2024-11-01 07:18:52
-
การตั้งค่ารับเมล์ Google Workspace ผ่าน Apple Mail (MAC)
Updated on 2024-11-01 07:18:42
-
การตั้งค่ารับเมล์ Google Workspace บน Android
Updated on 2024-11-01 07:18:40
-
การตั้งค่ารับเมล์ Google Workspace บน IPhone, IPad (IOS)
Updated on 2024-11-01 07:18:35

-
Domain
-
Hosting
-
Cloud & Managed
-
SSL
-
Email
- เรียนรู้เพิ่มเติม
- Microsoft 365 รุ่นต่างๆ
- Microsoft 365 สำหรับธุรกิจ
- Microsoft 365 สำหรับใช้งานที่บ้าน
- ทดลองฟรี
- G Suite
- เทคนิคลดต้นทุนอีเมล Microsoft 365 มากกว่า 28%
- เทคนิคลดต้นทุนอีเมล G Suite มากกว่า 19%
- Zimbra-Based Email
- Traditional Email by cPanel
- Physical to Cloud Migration
- Exchange Server to Microsoft 365 Migration
- G Suite to Microsoft 365 Migration
- Microsoft 365 to G Suite Migration
- Cloud to Cloud Migration
-
Microsoft
-
Google
-
Marketing
-
Others
-
Blog
-
Microsoft Teams
-
microsoft-365-business-premium
-
test-slide
-
Order
-
Promo

